
Navigating the mortgage process can feel daunting, but understanding the journey from pre-approval to closing is key to securing your dream home seamlessly. With the right guidance, homebuyers, real estate agents, and foreign investors can confidently move through each stage, from gathering necessary documents to managing closing costs. In this post, we’ll demystify the home loan steps, providing mortgage tips that will equip you with the knowledge to make informed decisions. As a trusted advisor in financing, we aim to empower you with insights and strategies to enhance your understanding of mortgages and encourage smooth transactions. Let us be your guide through this exciting venture, ensuring a positive and well-informed homebuying experience.
Understanding the Mortgage Process
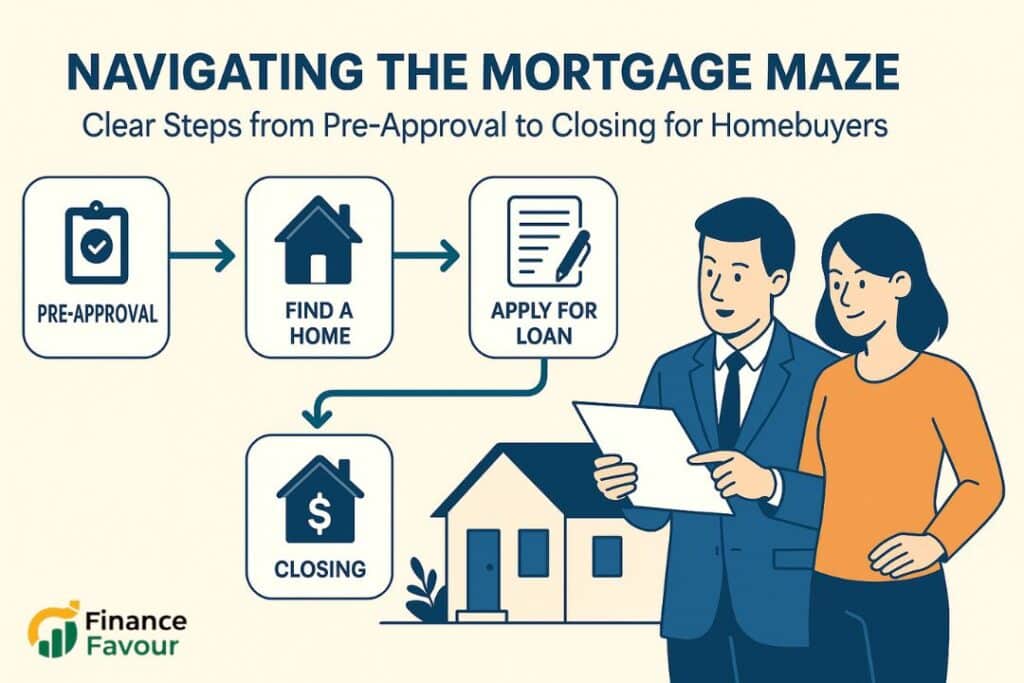
The mortgage process can seem complex, but breaking it down into manageable steps makes it easier to navigate. Let’s explore the key stages from pre-approval to finalizing your home loan.
Key Steps to Pre-Approval
Pre-approval is a crucial first step in the mortgage process. It provides a clear picture of your borrowing capacity and demonstrates to sellers that you’re a serious buyer.
- Check your credit score and report for any errors.
- Gather financial documents, including pay stubs and tax returns.
- Research lenders and compare their rates and terms.
Once you’ve prepared, submit your application to multiple lenders. They’ll review your financial situation and provide a pre-approval letter, typically valid for 60-90 days.
Remember, pre-approval is not a guarantee of a loan, but it’s a strong indicator of your ability to secure financing.
Essential Documents Checklist
Preparing your documentation in advance can significantly streamline the mortgage process. Here’s a comprehensive checklist of essential documents:
- Proof of income (W-2 forms, pay stubs, tax returns)
- Bank statements and investment account information
- Identification (driver’s license, passport)
- Proof of assets and debts
For self-employed individuals, additional documents may be required, such as profit and loss statements or business tax returns.
Organize these documents in a dedicated folder, both physical and digital, for easy access when needed.
Navigating Home Loan Steps
After pre-approval, the home loan process unfolds in several key stages:
- House hunting and offer acceptance: Find a home within your pre-approved budget and have your offer accepted.
- Loan application: Submit a formal mortgage application with your chosen lender.
- Underwriting: The lender verifies your financial information and assesses the property’s value.
- Loan approval: If everything checks out, you’ll receive final loan approval.
- Closing: Sign the necessary documents and complete the purchase.
Stay in close communication with your lender throughout this process to ensure a smooth transaction.
Demystifying Closing Costs
Closing costs are an important consideration in the home buying process. Understanding these expenses can help you budget effectively and avoid surprises at the end of your journey.
Breaking Down the Expenses
Closing costs typically range from 2% to 5% of the home’s purchase price. These expenses can be broadly categorized into lender fees and third-party fees.
Lender fees may include:
- Origination fees
- Application fees
- Underwriting fees
Third-party fees often cover:
- Appraisal costs
- Title search and insurance
- Attorney fees
- Recording fees
Some closing costs are negotiable, while others are fixed. It’s important to review your Loan Estimate carefully and ask your lender to explain any charges you don’t understand.
Preparing for Closing Day
As closing day approaches, there are several steps you can take to ensure a smooth process:
- Review your Closing Disclosure, which provides a final breakdown of your loan terms and closing costs.
- Conduct a final walk-through of the property to ensure it’s in the agreed-upon condition.
- Prepare a cashier’s check or arrange a wire transfer for your down payment and closing costs.
On closing day, be prepared to sign numerous documents. Take your time to read through each one, and don’t hesitate to ask questions if anything is unclear.
Remember, closing is the final step in your home buying journey. Once complete, you’ll receive the keys to your new home!
Expert Mortgage Tips
Navigating the mortgage process successfully requires knowledge and strategy. Here are some expert tips to help you avoid common pitfalls and streamline your approval process.
Avoiding Common Pitfalls
One of the biggest mistakes homebuyers make is changing their financial situation during the mortgage process. Avoid these common pitfalls:
- Don’t make large purchases or open new credit accounts
- Refrain from changing jobs unless absolutely necessary
- Avoid moving large sums of money between accounts without documentation
Maintain clear communication with your lender throughout the process. If any changes to your financial situation are unavoidable, inform your lender immediately to discuss potential impacts.
Remember, consistency and stability in your financial profile are key to a smooth mortgage approval.
Strategies for Smooth Approval
To increase your chances of a smooth mortgage approval:
- Improve your credit score: Pay down debts and correct any errors on your credit report.
- Save for a larger down payment: This can lower your loan-to-value ratio and potentially secure better terms.
- Get your finances in order: Organize all necessary documents well in advance.
- Be responsive: Quickly provide any additional information or documentation requested by your lender.
- Consider a mortgage broker: They can help you navigate the process and find the best loan options for your situation.
By following these strategies and working closely with your lender or mortgage broker, you can navigate the mortgage process with confidence and ease.
Here’s the fully expanded explanation of the six steps of the mortgage process:
1. Pre-Approval
This is where it all starts. Before you start scrolling through listings or attending open houses, it’s smart to get pre-approved for a mortgage. You’ll fill out a basic application with a lender, providing income, asset, debt, and credit information. The lender then reviews your financial profile and gives you a pre-approval letter stating how much they’re likely to lend you.
This step gives you a serious advantage. It shows real estate agents and sellers that you’re a qualified buyer. Plus, it helps set realistic expectations so you shop within your budget.
2. House Shopping
Now comes the fun part: finding your dream home. Whether you’re hunting solo or working with a real estate agent, you’ll visit properties, explore neighborhoods, and weigh your wants vs. needs.
Remember to stay grounded. It’s easy to get emotional when house hunting, but sticking to the price range from your pre-approval keeps you from falling in love with a home that could stretch your finances thin.
3. Mortgage Application
Once you’ve found “the one” and your offer has been accepted, it’s time to officially apply for a mortgage. Even though you’ve been pre-approved, this is the real deal.
You’ll submit a full application along with documentation like pay stubs, bank statements, tax returns, and more. The lender uses this data to finalize your loan terms and move you toward closing.
Tip: Respond to your lender’s requests quickly. Any delays on your end can drag out the process.
4. Loan Processing
At this stage, your file is handed over to a loan processor. Their job? To comb through your paperwork, verify information, and prepare the file for underwriting. They’ll order an appraisal to confirm the home’s value and may request additional documentation from you.
You may not hear as much from your lender during this phase, but rest assured things are happening behind the scenes.
5. Underwriting
Underwriting is the final review and the toughest hurdle. An underwriter double-checks everything to make sure the loan meets guidelines. They assess your credit, income, debt-to-income ratio, and the home’s value.
The underwriter can issue one of three responses: approval, conditional approval (they need more info), or denial. If they need more info, respond fast to keep your closing timeline on track.
6. Closing
The finish line! You’ll receive a Closing Disclosure at least three business days before the big day. This document breaks down the loan terms, closing costs, taxes, insurance, and what you’ll need to bring to closing (usually a cashier’s check or wire transfer).
On closing day, you’ll sign a mountain of paperwork. Once it’s all done, the keys are yours. Congratulations—you’re now a homeowner!